Tìm kiếm, lọc, và nhóm bản ghi
Odoo allows for the searching, filtering, and grouping of records in a view to display only the most relevant records. The search bar is located at the top of the view, start typing to search for values, or click the 🔽 (down arrow) icon to access the Filter, Group By, and Favorites drop-down menus.
Tìm kiếm giá trị
Sử dụng trường tìm kiếm để nhanh chóng tìm kiếm các giá trị cụ thể và thêm chúng làm bộ lọc. Nhập giá trị cần tìm và chọn tùy chọn mong muốn từ menu thả xuống để áp dụng bộ lọc tìm kiếm.
Example
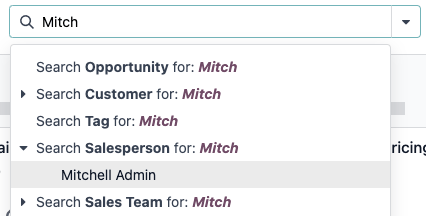
Instead of adding a custom filter to select records where
Mitchell Admin is the salesperson on the Sales Analysis report (), search for Mitch, and click the ⏵ (right arrow) next to
Search Salesperson for: Mitch, and select Mitchell Admin.
Ghi chú
Using the search field is equivalent to using the contains operator when adding a custom filter. If a partial value is entered, and the desired field is directly selected (without selecting the ⏵ (right arrow)), all records containing the typed characters for the selected field are included.
Bộ lọc
Filters are used to select records that meet specific criteria. The default selection of records is specific to each view, but can be modified by selecting one (or several) preconfigured filters, or by adding a custom filter.
Bộ lọc cấu hình sẵn
Modify the default selection of records by clicking the 🔽 (down arrow) icon from the search bar, and selecting one (or several) preconfigured filters from the Filters drop-down menu.
Example
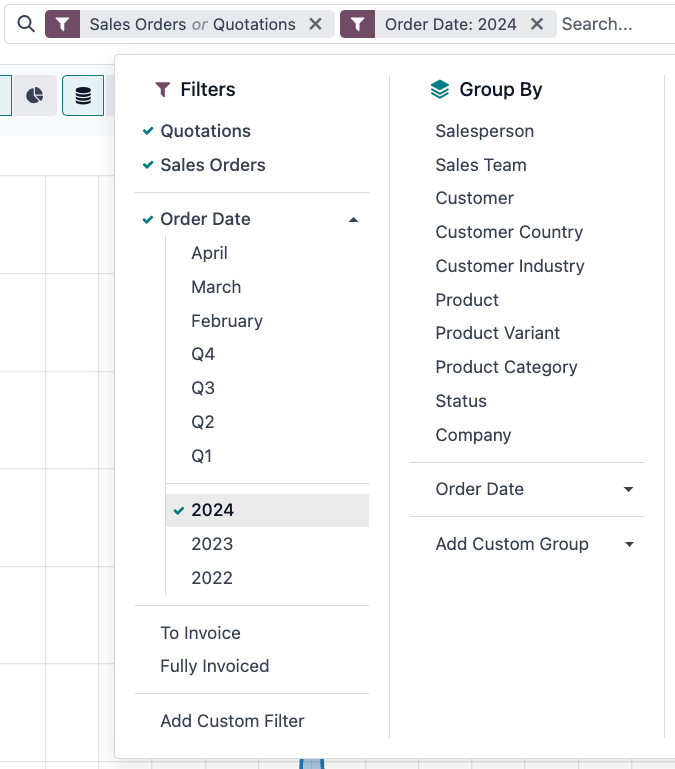
Theo mặc định, trên báo cáo Phân tích doanh số (:menuselection:ứng dụng Bán hàng --> Báo cáo --> Doanh số), chỉ những bản ghi đang ở giai đoạn đơn bán hàng, có ngày đặt hàng trong vòng 365 ngày qua mới được chọn.
Để bao gồm cả bản ghi ở giai đoạn báo giá, hãy chọn :guilabel:Báo giá từ :guilabel:Bộ lọc.
Ngoài ra, để chỉ bao gồm các đơn bán hàng và báo giá từ một năm cụ thể, ví dụ như năm 2024, trước tiên hãy xóa bộ lọc Ngày đặt hàng: 365 ngày qua hiện có bằng cách nhấp vào biểu tượng :guilabel:❌ (xóa), sau đó chọn :menuselection:Ngày đặt hàng --> 2024.
Ghi chú
The preconfigured Filters are grouped, and each group is separated by a horizontal line. Selecting preconfigured filters from the same group allows records to match any of the applied conditions. However, selecting filters from different groups requires records to match all of the applied conditions.
Bộ lọc tuỳ chỉnh
If the preconfigured filters are not specific enough, add a custom filter. To do so, click the 🔽 (down arrow) icon in the search bar, then select .
The Add Custom Filter pop-up window displays the matching option, filter rule, and a toggle to Include archived records.
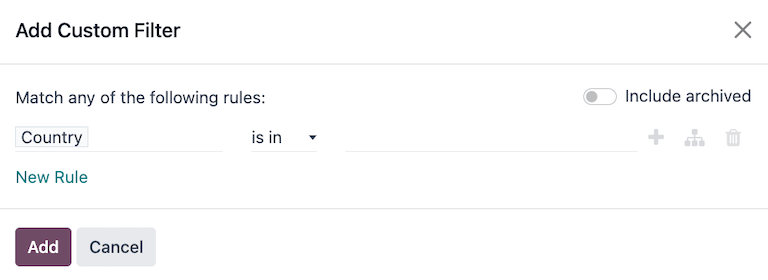
The default matching configuration is to Match any of the following rules, indicating that each filter rule is applied independently. To change the matching configuration to Match all of the following rules, at least two filter rules must be added to the custom filter.
Match all 🔽 of the following rules: all of the filter rules must be met. Logically, this is an AND (
&) operation.Match any 🔽 of the following rules: any of the filter rules can be met. Logically, this is an OR (
|) operation.
Theo mặc định, một quy tắc lọc duy nhất được thêm vào bộ lọc tùy chỉnh. Thông tin sau mô tả cấu trúc của một quy tắc lọc:
The first inline field is the field name to filter by. Some fields have refined parameters that are nested within another field. These fields have an > (arrow) icon beside them, which can be selected to reveal the nested fields.
The second inline field is the conditional operator used to compare the field name to the value. The available conditional operators are specific to the field’s data type.
Trường nội tuyến thứ ba là biến giá trị của tên trường. Giá trị đầu vào có thể xuất hiện dưới dạng menu thả xuống, đầu vào dạng văn bản, đầu vào dạng số, đầu vào dạng ngày/giờ, bộ chọn boolean hoặc có thể được để trống, tùy thuộc vào toán tử được sử dụng và kiểu dữ liệu của trường.
Ba nút nội tuyến cũng có ở bên phải tiêu chí lọc của quy tắc:
➕ (plus sign): adds a new rule below the existing rule.
(Add branch): adds a new group of rules below the existing rule, with the any and all matching options available to define how each rule within this branch is applied to the filter. If the matching option is set to the same as the parent group, the fields are moved to join the parent group.
Example
Nếu tùy chọn so khớp được đặt thành :guilabel:
Khớp tất cả 🔽 quy tắc sauvà một nhánh mới được thêm vào với tùy chọn so khớp được thay đổi từ :guilabel:bất kỳ 🔽thành :guilabel:tất cả 🔽, thì nhánh mới được thêm vào sẽ biến mất và nhóm quy tắc của nhánh đó sẽ được chuyển đến nhóm chính.🗑️ (garbage can): deletes the node. If a branch node is deleted, all children of that node are deleted, as well.
A new filter rule can be added to the custom filter by clicking the New Rule button.
Once the filter criteria are defined, click Add to add the custom filter to the view.
Example
Để nhắm mục tiêu đến tất cả lead và cơ hội từ ứng dụng :menuselection:CRM đang trong giai đoạn Đạt và có doanh thu dự kiến lớn hơn $1.000, bạn cần nhập thông tin sau:
Match all 🔽 (down arrow) of the following rules:
Stage is in Won
Expected Revenue >
1,000any 🔽 (down arrow) of:
Type = Lead
Type = Opportunity

Mẹo
Activate Chế độ lập trình viên (chế độ gỡ lỗi) to reveal each field’s technical name and data type, as well as the # Code editor text area below the filter rules, to view and edit the domain manually.
Nhóm bản ghi
The display of records in a view can be clustered together, according to one of the preconfigured groups. To do so, click the 🔽 (down arrow) icon in the search bar, then select one of the Group By options from the drop-down menu.
Example
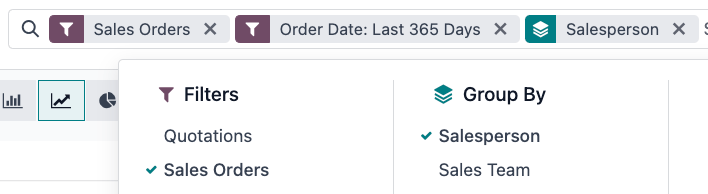
Để nhóm các bản ghi theo chuyên viên sales trên báo cáo Phân tích bán hàng (:menuselection:Ứng dụng Bán hàng --> Báo cáo --> Bán hàng), hãy nhấp vào tùy chọn :guilabel:Chuyên viên sales từ menu :guilabel:Nhóm theo thả xuống. Chế độ xem sẽ thay đổi để nhóm các bản ghi theo chuyên viên sales, mà không lọc bất kỳ bản ghi nào.
It is possible to customize groups by using a field present on the model. To do so, click , and select a field from the drop-down menu.
Ghi chú
Bạn có thể sử dụng nhiều nhóm cùng lúc. Nhóm đầu tiên được chọn là nhóm chính, nhóm tiếp theo được thêm vào sẽ chia nhỏ các danh mục của nhóm chính,… Ngoài ra, có thể sử dụng bộ lọc và nhóm cùng nhau để tinh chỉnh chế độ xem hơn nữa.
So sánh
Certain reporting dashboards include a Comparison section in the drop-down menus of their Search... bars. This includes the Overall Equipment Effectiveness report for the Manufacturing app, and the Purchase report for the Purchase app, among others.
The options in the Comparison section are used to compare data from two different time periods. There are two comparison options to choose from: (Time Filter): Previous Period and (Time Filter): Previous Year.
Quan trọng
For some reports, the Comparison section only appears in the Search... bar drop-down menu if one (or more) time periods have been selected in the Filters column. This is because, if no time period is specified, there is nothing to compare.
Additionally, some reports only allow use of the Comparison feature when the (pie chart) graph type, or the (pivot) view, is selected. A Comparison option can be selected even if another view is enabled, but doing so does not change the way data is displayed on the report.
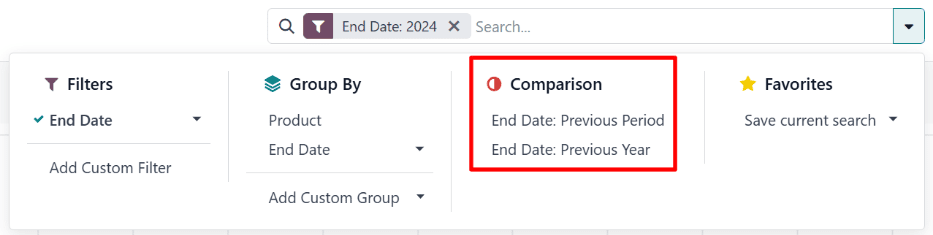
To view data using one of the two comparisons, begin by selecting a time period in the Filters column of the Search... bar drop-down menu. Then, select either (Time Filter): Previous Period or (Time Filter): Previous Year in the Comparison section.
With one of the Comparison options enabled, the report compares the data for the selected period, with the data for the same unit of time (month, quarter, year), one period or year prior. The way the data is displayed depends on the selected view:
The (bar chart) shows two bars, side-by-side, for each unit of time for the selected time period. The left bar represents the selected time period, while the right bar represents the previous time period.
The (line chart) is displayed with two lines, one representing the selected time period, and the other representing the previous time period.
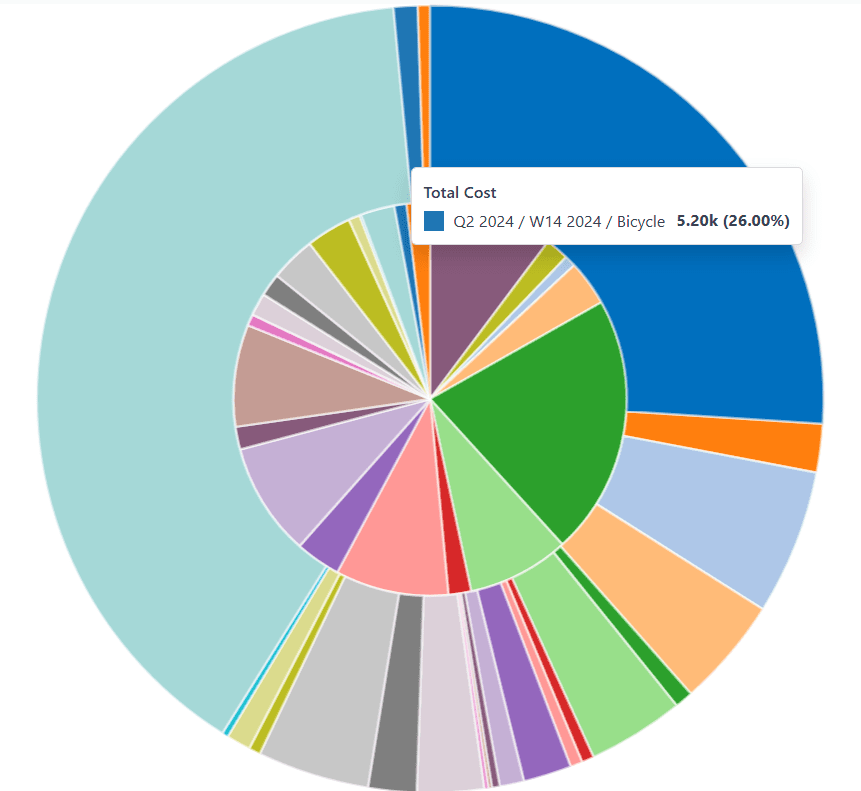
The (pie chart) appears as a large circle with a smaller circle inside. The larger circle represents the selected time period, while the smaller circle represents the previous time period.
The (pivot table) is displayed with each column split into two smaller columns. The right column represents the selected time period, while the left column represents the previous time period.
Example
Trong báo cáo :guilabel:Phân tích sản xuất của ứng dụng :menuselection:Sản xuất, dữ liệu quý hai của năm 2024 được so sánh với dữ liệu quý hai của năm 2023. :guilabel:Q2 được chọn trong phần bộ lọc :guilabel:Ngày kết thúc trong menu thả xuống của thanh :guilabel:Tìm kiếm... :guilabel:Ngày kết thúc: Năm trước được chọn trong phần :guilabel:So sánh.
Năm hiện tại là 2024, do đó, vòng tròn lớn hiển thị dữ liệu của quý 2 (Q2) năm 2024. Vòng tròn nhỏ hiển thị dữ liệu của quý 2 (Q2) năm 2023, cùng kỳ nhưng trước đó một năm.
Thay vào đó, nếu chọn :guilabel:Ngày kết thúc: Giai đoạn trước, vòng tròn nhỏ sẽ hiển thị dữ liệu cho quý đầu tiên (Q1) của năm 2024, là cùng một khoảng thời gian, nhưng trước một giai đoạn.
Yêu thích
Mục Yêu thích là cách lưu một tìm kiếm cụ thể để sử dụng sau này hoặc làm bộ lọc mặc định mới cho chế độ xem.
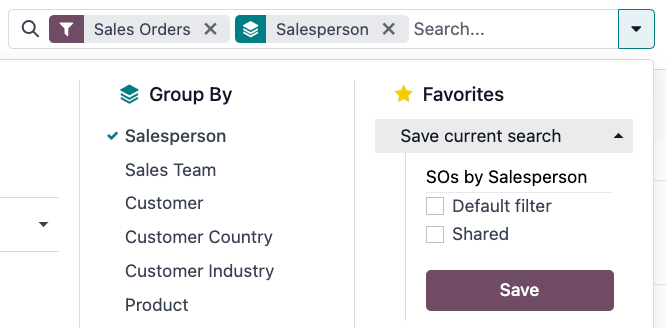
To save the current view as a favorite, click the 🔽 (down arrow) icon in the search bar, then select the Save current search drop-down menu to display the following options:
Tên bộ lọc: Tên của tìm kiếm yêu thích.
Default filter: sets the favorited search as the default filter for the view.
Shared: makes the favorited search available to all users. By default, the favorited search is only available to the user who created it.
Once the options are set, click Save to save the favorited search.
Saved favorites can be accessed by clicking the 🔽 (down arrow) icon in the search bar, then selecting the saved filter in the Favorites drop-down menu. To remove a saved favorite, click the 🗑️ (garbage can) icon next to the favorited search.
Mẹo
To view all favorited searches, first activate Chế độ lập trình viên (chế độ gỡ lỗi), and navigate to . From here, all favorited searches can be viewed, edited, archived, or deleted.