Xuất và nhập dữ liệu
Trong Odoo, đôi khi cần phải xuất hoặc nhập dữ liệu để chạy báo cáo hoặc để sửa đổi dữ liệu. Tài liệu này đề cập đến việc xuất và nhập dữ liệu vào và ra khỏi Odoo.
Quan trọng
Thỉnh thoảng, người dùng gặp phải lỗi ‘hết thời gian’ hoặc bản ghi không xử lý được do vấn đề kích thước. Điều này có thể xảy ra trong trường hợp các tệp xuất hoặc nhập quá lớn. Để tránh giới hạn về kích thước bản ghi này, hãy tiến hành xuất hoặc nhập theo nhiều lần với kích thước nhỏ hơn.
Xuất dữ liệu từ Odoo
Khi làm việc với cơ sở dữ liệu, đôi khi cần phải xuất dữ liệu trong một tệp riêng biệt. Việc này có thể hỗ trợ báo cáo về các hoạt động, dù Odoo vốn đã cung cấp một công cụ báo cáo chính xác và dễ dàng trong từng ứng dụng.
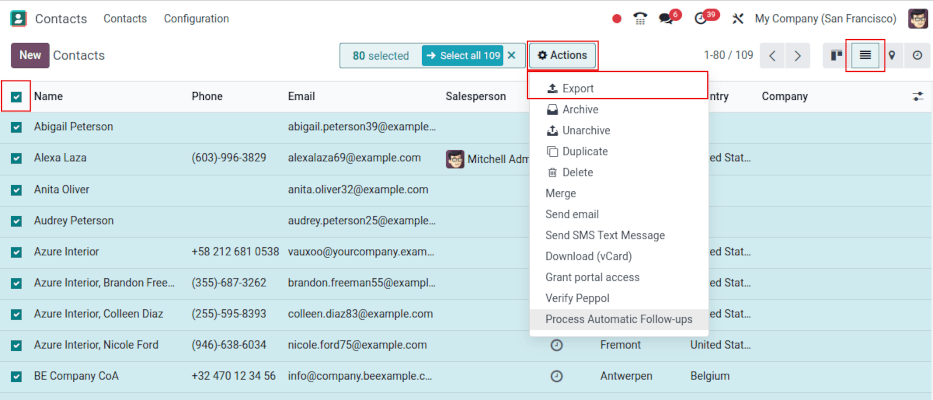
With Odoo, the values can be exported from any field in any record. To do so, activate the list view ( (list) icon), on the items that need to be exported, then select the records that should be exported. To select a record, tick the checkbox next to the corresponding record. Finally, click on Actions, then Export.
When clicking on Export, an Export Data pop-over window appears, with several options for the data to export:
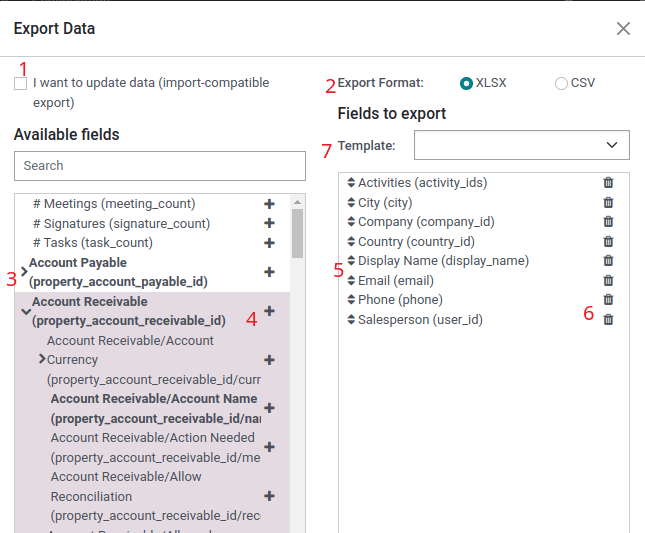
With the I want to update data (import-compatable export) option ticked, the system only shows the fields that can be imported. This is helpful in the case where the existing records need to be updated. This works like a filter. Leaving the box unticked, gives many more field options because it shows all the fields, not just the ones that can be imported.
Khi xuất, có tùy chọn xuất theo hai định dạng:
.csvvà.xls. Với.csv, các mục được phân tách bằng dấu phẩy, trong khi.xlschứa thông tin về tất cả bảng tính trong một tệp, bao gồm cả nội dung và định dạng.These are the items that can be exported. Use the > (right arrow) icon to display more sub-field options. Use the Search bar to find specific fields. To use the Search option more efficiently, click on all the > (right arrows) to display all fields.
The + (plus sign) icon button is present to add fields to the Fields to export list.
The ↕️ (up-down arrow) to the left of the selected fields can be used to move the fields up and down, to change the order in which they are displayed in the exported file. Drag-and-drop using the ↕️ (up-down arrow) icon.
The 🗑️ (trash can) icon is used to remove fields. Click on the 🗑️ (trash can) icon to remove the field.
For recurring reports, it is helpful to save export presets. Select all the needed fields, and click on the template drop-down menu. Once there, click on New template, and give a unique name to the export just created. Click the 💾 (floppy drive) icon to save the configuration. The next time the same list needs to be exported, select the related template that was previously saved from the drop-down menu.
Mẹo
It is helpful to know the field’s external identifier. For example, Related Company in the export user interface is equal to parent_id (external identifier). This is helpful because then, the only data exported is what should be modified and re-imported.
Nhập dữ liệu từ Odoo
Importing data into Odoo is extremely helpful during implementation, or in times where data needs to be updated in bulk. The following documentation covers how to import data into an Odoo database.
Cảnh báo
Việc nhập dữ liệu là một hành động là vĩnh viễn và không thể hoàn tác. Tuy nhiên, có thể sử dụng bộ lọc (được tạo vào hoặc được sửa đổi lần cuối) để xác định các bản ghi đã thay đổi hoặc được tạo bởi lần nhập dữ liệu.
Mẹo
Activating developer mode changes the visible import settings in the left menu. Doing so reveals an menu. Included in this advanced menu are two options: Track history during import and Allow matching with subfields.
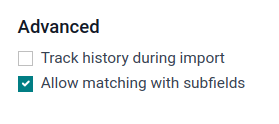
If the model uses openchatter, the Track history during import option sets up subscriptions and sends notifications during the import, but leads to a slower import.
Should the Allow matching with subfields option be selected, then all subfields within a field are used to match under the Odoo Field while importing.
Bắt đầu
Data can be imported on any Odoo business object using either Excel (.xlsx) or CSV (.csv) formats. This includes: contacts, products, bank statements,
journal entries, and orders.
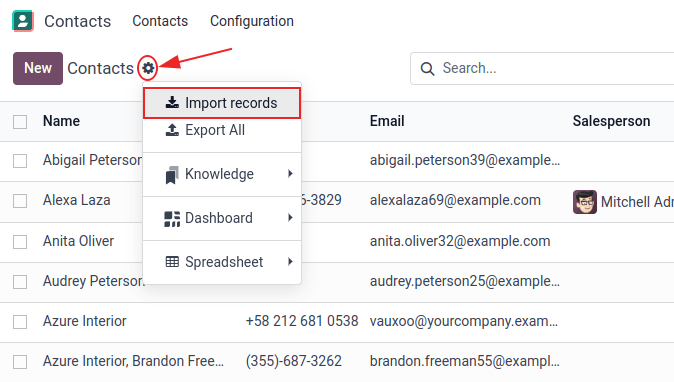
Open the view of the object to which the data should be imported/populated, click the (gear) icon and select Import records.
Click Import Template for Customers at the center of the page to download a template and populate it with the company’s own data. Such templates can be imported in one click since the data mapping is already preconfigured.
To upload the downloaded template or your own file, follow the next steps:
Click Upload Data File and select the desired file.
Adjust the Formatting options as needed (for CSV files only).
Ensure all data in the File Column is correctly mapped to the appropriate Odoo Field and free of errors.
(Optional) Click Load Data File to reload the same file or upload a different one.
Click Test to verify that the data is valid.
Click Import.
Ghi chú
The Formatting options do not appear when importing the proprietary Excel file
type (i.e., .xls or .xlsx).
Điều chỉnh mẫu
Các mẫu nhập được cung cấp trong công cụ nhập của những loại dữ liệu cần nhập phổ biến nhất (liên hệ, sản phẩm, sao kê ngân hàng,…). Mở chúng bằng bất kỳ phần mềm bảng tính nào (Microsoft Office, OpenOffice, Google Drive,…).
Sau khi tải mẫu xuống, hãy làm theo các bước sau:
Thêm, xóa và sắp xếp các cột sao cho phù hợp nhất với cấu trúc dữ liệu.
It is strongly advised to not remove the External ID (ID) column (see why in the next section).
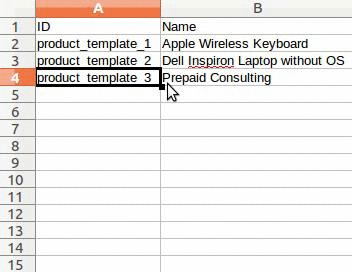
Set a unique ID to every record by dragging down the ID sequencing in the External ID (ID) column.
Ghi chú
Khi thêm một cột mới, Odoo có thể không tự động map được cột đó nếu nhãn của cột đó không phù hợp với bất kỳ trường nào trong Odoo. Tuy nhiên, bạn có thể map thủ công các cột mới khi kiểm thử quá trình nhập. Tìm kiếm trong menu thả xuống để tìm trường tương ứng.
Sau đó, sử dụng nhãn của trường này trong tệp nhập để đảm bảo các lần nhập trong tương lai thành công.
Mẹo
Một cách hữu ích khác để tìm ra tên cột thích hợp cần nhập là xuất tệp mẫu bằng các trường cần nhập. Theo cách này, nếu không có mẫu nhập mẫu, tên sẽ chính xác.
Nhập từ một ứng dụng khác
The External ID (ID) is a unique identifier for the line item. Feel free to use one from previous software to facilitate the transition to Odoo.
Việc thiết lập ID không bắt buộc khi nhập, nhưng sẽ hữu ích trong nhiều trường hợp:
Update imports: import the same file several times without creating duplicates.
To recreate relationships between different records, the unique identifier from the original application should be used to map it to the External ID (ID) column in Odoo.
Khi một bản ghi khác được nhập và liên kết đến bản ghi đầu tiên, hãy sử dụng XXX/ID (XXX/ID ngoài) cho ID duy nhất ban đầu. Bản ghi này cũng có thể được tìm bằng tên.
Cảnh báo
Cần lưu ý rằng xung đột sẽ xảy ra nếu hai (hoặc nhiều) bản ghi có cùng ID ngoài.
Thiếu trường để map cột
Odoo sẽ cố gắng tìm loại trường cho mỗi cột bên trong tệp được nhập dựa trên mười dòng đầu tiên của tệp.
Ví dụ, nếu có một cột chỉ chứa số, thì chỉ những trường thuộc loại số nguyên mới được hiển thị dưới dạng tùy chọn.
Mặc dù hành vi này có thể hữu ích trong hầu hết các trường hợp, nhưng cũng có khả năng nó sẽ không thành công hoặc cột có thể được map tới một trường không được đề xuất theo mặc định.
If this happens, check the Show fields of relation fields (advanced) option, then a complete list of fields becomes available for each column.
Thay đổi định dạng nhập dữ liệu
Ghi chú
Odoo có thể tự động phát hiện xem một cột có phải là ngày hay không và cố gắng đoán định dạng ngày từ một tập hợp các định dạng ngày được sử dụng phổ biến nhất. Mặc dù quy trình này có thể khả dụng với nhiều định dạng ngày, nhưng vẫn có một số định dạng ngày không thể nhận dạng được. Điều này có thể gây nhầm lẫn do đảo ngược ngày-tháng, nên sẽ rất khó để đoán phần nào của định dạng ngày là ngày và phần nào là tháng trong một ngày, chẳng hạn như 01-03-2016.
When importing a CSV file, Odoo provides Formatting options.
To view which date format Odoo has found from the file, check the Date Format that is shown when clicking on options under the file selector. If this format is incorrect, change it to the preferred format using ISO 8601 to define the format.
Quan trọng
ISO 8601 là một tiêu chuẩn quốc tế quy định việc trao đổi thông tin cùng với việc truyền đạt dữ liệu liên quan đến ngày và giờ trên toàn thế giới. Ví dụ, khi định dạng ngày tháng là YYYY-MM-DD; trong trường hợp ngày 24 tháng 7 năm 1981, nó phải được viết là 1981-07-24`.
Mẹo
When importing Excel files (.xls, .xlsx), consider using date cells to store dates. This
maintains locale date formats for display, regardless of how the date is formatted in Odoo. When
importing a CSV file, use Odoo’s Formatting section
to select the date format columns to import.
Nhập số kèm ký hiệu tiền tệ
Odoo hỗ trợ đầy đủ các số có dấu ngoặc đơn để biểu thị dấu âm, cũng như các số có dấu tiền tệ đi kèm. Odoo cũng tự động phát hiện dấu phân cách hàng nghìn/dấu thập phân nào được sử dụng. Nếu sử dụng ký hiệu tiền tệ mà Odoo không thể xác định, thì ký hiệu đó có thể không được nhận dạng là số và quá trình nhập sẽ bị lỗi.
Ghi chú
When importing a CSV file, the Formatting menu appears on the left-hand column. Under these options, the Thousands Separator can be changed.
Ví dụ về các số được hỗ trợ (sử dụng ‘ba mươi hai nghìn’ làm con số):
32.000,00
32000,00
32,000.00
-32000.00
(32000.00)
$ 32.000,00
(32000.00 €)
Ví dụ về dữ liệu không được hỗ trợ
ABC 32.000,00
$ (32.000,00)
Quan trọng
A () (parenthesis) around the number indicates that the number is a negative value. The currency symbol must be placed within the parenthesis for Odoo to recognize it as a negative currency value.
Bảng xem trước nhập dữ liệu không hiển thị đúng
By default, the import preview is set on commas as field separators, and quotation marks as text delimiters. If the CSV file does not have these settings, modify the Formatting options (displayed under the Import CSV file bar after selecting the CSV file).
Quan trọng
If the CSV file has a tabulation as a separator, Odoo does not detect the separations. The file format options need to be modified in the spreadsheet application. See the following Change CSV file format section.
Thay đổi định dạng tệp CSV trong ứng dụng bảng tính
When editing and saving CSV files in spreadsheet applications, the computer’s regional settings are applied for the separator and delimiter. Odoo suggests using OpenOffice or LibreOffice, as both applications allow modifications of all three options (from LibreOffice application, go to ).
Microsoft Excel can modify the encoding when saving ().
Sự khác biệt giữa ID cơ sở dữ liệu và ID ngoài
Một số trường xác định mối quan hệ với một đối tượng khác. Ví dụ, quốc gia của một liên hệ là liên kết đến bản ghi của đối tượng ‘Quốc gia’. Khi các trường này được nhập, Odoo phải tạo lại liên kết giữa các bản ghi khác nhau. Để hỗ trợ nhập các trường như vậy, Odoo cung cấp ba cơ chế.
Quan trọng
Chỉ nên sử dụng một cơ chế cho mỗi trường được nhập.
Ví dụ, để tham chiếu quốc gia của một liên hệ, Odoo đề xuất ba trường khác nhau để nhập:
Country: the name or code of the country
Country/Database ID: the unique Odoo ID for a record, defined by the ID PostgreSQL column
Country/External ID: the ID of this record referenced in another application (or the
.XMLfile that imported it)
Ví dụ, khi quốc gia là Bỉ, hãy sử dụng một trong ba cách sau để nhập:
Country:
BelgiumCountry/Database ID:
21Country/External ID:
base.be
Theo nhu cầu của công ty, hãy sử dụng một trong ba cách sau để tham chiếu hồ sơ trong quan hệ. Sau đây là ví dụ khi nào nên sử dụng cách nào, tùy theo nhu cầu:
Use Country: this is the easiest way when data comes from CSV files that have been created manually.
Use Country/Database ID: this should rarely be used. It is mostly used by developers as the main advantage is to never have conflicts (there may be several records with the same name, but they always have a unique Database ID)
Use Country/External ID: use External ID when importing data from a third-party application.
When External IDs are used, import CSV files with the
External ID (ID) column defining the External ID of each record that is imported.
Then, a reference can be made to that record with columns, like Field/External ID. The following
two CSV files provide an example for products and their categories.
Nhập trường quan hệ
Một đối tượng Odoo luôn liên quan đến nhiều đối tượng khác (VD: một sản phẩm được liên kết với danh mục sản phẩm, thuộc tính, nhà cung cấp,…). Để nhập các mối quan hệ đó, trước tiên cần nhập các bản ghi của đối tượng liên quan từ menu danh sách của riêng chúng.
Điều này có thể đạt được bằng cách sử dụng tên của bản ghi liên quan hoặc ID của bản ghi đó, tùy từng trường hợp. ID được sử dụng khi hai bản ghi có cùng tên. Khi đó, hãy thêm /ID vào cuối tiêu đề cột (VD: đối với thuộc tính sản phẩm: Thuộc tính sản phẩm/Thuộc tính/ID).
Tùy chọn cho nhiều kết quả khớp trên các trường
Ví dụ, nếu có hai danh mục sản phẩm có tên thành phần là Có thể bán (ví dụ: Sản phẩm hỗn hợp/Có thể bán & Sản phẩm khác/Có thể bán), thì quá trình xác thực sẽ dừng lại, nhưng dữ liệu vẫn có thể được nhập. Tuy nhiên, Odoo khuyến nghị không nhập dữ liệu vì tất cả sẽ được liên kết với danh mục Có thể bán đầu tiên được tìm thấy trong danh sách Danh mục sản phẩm (Sản phẩm hỗn hợp/Có thể bán). Thay vào đó, bạn nên sửa đổi một trong các giá trị trùng lặp hoặc phân cấp danh mục sản phẩm.
Tuy nhiên, nếu công ty không muốn thay đổi cấu hình danh mục sản phẩm, Odoo khuyên bạn nên sử dụng ID ngoài cho trường ‘Danh mục’ này.
Nhập trường quan hệ many2many
The tags should be separated by a comma, without any spacing. For example, if a customer needs to be
linked to both tags: Manufacturer and Retailer then ‘Manufacturer,Retailer’ needs to be encoded
in the same column of the CSV file.
Nhập quan hệ one2many
If a company wants to import a sales order with several order lines, a specific row must be reserved in the CSV file for each order line. The first order line is imported on the same row as the information relative to order. Any additional lines need an additional row that does not have any information in the fields relative to the order.
As an example, here is a CSV file of some quotations that can be imported, based on demo data:
The following CSV file shows how to import purchase orders with their respective purchase order lines:
The following CSV file shows how to import customers and their respective contacts:
Import image files
To import image files along with the uploaded CSV or Excel file, follow the next steps:
Add the image file names to the relevant Image column in the data file.
Upload the data file or reload it by clicking Load Data File.
Click Upload your files under the Files to import section.
Select the relevant image files. The number of files selected appears next to the button.
Click Test to verify that all data is valid.
Click Import. During the import process, Odoo performs a file check to automatically link the uploaded images to the imported data file. If there is no match, the data file is imported without any image.
Ghi chú
The Files to import section is enabled if your product template has an Image column with all fields populated.
The image file names in the data file must correspond to the uploaded image files.
When importing a large number of images, you can specify the maximum batch size in megabytes and set a delay to prevent the system from becoming overloaded. To do so, enable the developer mode and fill in the Max size per batch and the Delay after each batch fields in the Files to import section. By default, the delay meets the RPC/API call limit defined in the Odoo Cloud - Acceptable Use Policy.
Nhập bản ghi nhiều lần
If an imported file contains one of the columns: External ID or Database ID, records that have already been imported are modified, instead of being created. This is extremely useful as it allows users to import the same CSV file several times, while having made some changes in between two imports.
Odoo sẽ xử lý việc tạo hoặc sửa đổi từng bản ghi, tùy thuộc vào việc bản ghi đó có mới hay không.
Tính năng này cho phép công ty sử dụng Công cụ nhập/xuất trong Odoo để sửa đổi hàng loạt bản ghi trong ứng dụng bảng tính.
Giá trị không được cung cấp cho một trường cụ thể
If all fields are not set in the CSV file, Odoo assigns the default value for every non-defined field. But, if fields are set with empty values in the CSV file, Odoo sets the empty value in the field, instead of assigning the default value.
Xuất/nhập các bảng khác nhau từ ứng dụng SQL vào Odoo
Nếu dữ liệu cần được nhập từ các bảng khác nhau, cần phải tạo lại các mối quan hệ giữa những bản ghi thuộc về các bảng khác nhau. Ví dụ, nếu cần nhập công ty và người, thì bạn cần phải tạo lại liên kết giữa mỗi người và công ty mà họ làm việc.
Để quản lý mối quan hệ giữa các bảng, hãy sử dụng tiện ích ID ngoài của Odoo. ID ngoài của một bản ghi là mã định danh duy nhất của bản ghi này trong một ứng dụng khác. ID ngoài không được trùng lặp trên tất cả bản ghi của mọi đối tượng. Một phương pháp hữu ích là thêm tiền tố ID ngoài này bằng tên của ứng dụng hoặc bảng (như, ‘company_1’, ‘person_1’ - thay vì ‘1’).
Ví dụ, giả sử có một cơ sở dữ liệu SQL với hai bảng cần nhập: công ty và người. Mỗi người thuộc về một công ty, thì liên kết giữa một người và công ty mà họ làm việc phải được tạo lại.
Test this example, with a sample of a PostgreSQL database.
Đầu tiên, xuất tất cả công ty và ID ngoài của chúng. Trong PSQL, hãy viết lệnh sau:
> copy (select 'company_'||id as "External ID",company_name as "Name",'True' as "Is a Company" from companies) TO '/tmp/company.csv' with CSV HEADER;
This SQL command creates the following CSV file:
External ID,Name,Is a Company
company_1,Bigees,True
company_2,Organi,True
company_3,Boum,True
To create the CSV file for people linked to companies, use the following SQL command in PSQL:
> copy (select 'person_'||id as "External ID",person_name as "Name",'False' as "Is a Company",'company_'||company_id as "Related Company/External ID" from persons) TO '/tmp/person.csv' with CSV
It produces the following CSV file:
External ID,Name,Is a Company,Related Company/External ID
person_1,Fabien,False,company_1
person_2,Laurence,False,company_1
person_3,Eric,False,company_2
person_4,Ramsy,False,company_3
Trong tệp này, Fabien và Laurence đang làm việc cho công ty Bigees (company_1), và Eric đang làm việc cho công ty Organi. Mối quan hệ giữa mọi người và công ty được thực hiện bằng cách sử dụng ID ngoài của các công ty. ID ngoài được thêm tiền tố là tên của bảng để tránh xung đột ID giữa người và công ty (person_1 và company_1, những người có cùng một ID 1 trong cơ sở dữ liệu gốc).
The two files produced are ready to be imported in Odoo without any modifications. After having imported these two CSV files, there are four contacts and three companies (the first two contacts are linked to the first company). Keep in mind to first import the companies, and then the people.
Cập nhật dữ liệu trong Odoo
Existing data can be updated in bulk through a data import, as long as the External ID remains consistent.
Chuẩn bị xuất dữ liệu
To update data through an import, first navigate to the data to be updated, and select the (list) icon to activate list view. On the far-left side of the list, tick the checkbox for any record to be updated. Then, click Actions, and select Export from the drop-down menu.
On the resulting Export Data pop-up window, tick the checkbox labeled, I want to update data (import-compatible export). This automatically includes the External ID in the export. Additionally, it limits the Fields to export list to only include fields that are able to be imported.
Ghi chú
The External ID field does not appear in the Fields to export list unless it is manually added, but it is still included in the export. However, if the I want to update data (import-compatible export) checkbox is ticked, it is included in the export.
Select the required fields to be included in the export using the options on the pop-up window, then click Export.
Nhập dữ liệu được cập nhật
After exporting, make any necessary changes to the data file. When the file is ready, it can be imported by following the same process as a normal data import.
Nguy hiểm
Khi cập nhật dữ liệu, điều cực kỳ quan trọng là ID ngoài phải nhất quán, vì đây là cách hệ thống xác định bản ghi. Nếu ID bị thay đổi hoặc xóa, hệ thống có thể thêm bản ghi trùng lặp, thay vì cập nhật bản ghi hiện có.