Hoạt động
Hoạt động là các nhiệm vụ follow-up liên quan đến một bản ghi trong cơ sở dữ liệu Odoo.
The icon used to display activities varies, depending on the activity type:
(clock) icon: the default activities icon.
(phone) icon: a phone call is scheduled.
(envelope) icon: an email is scheduled.
(check) icon: a “to-do” is scheduled.
(people) icon: a meeting is scheduled.
(upload) icon: a document is scheduled to be uploaded.
(request signature) icon: a signature request is scheduled.
Lên lịch hoạt động
Activities can be scheduled on any page of the database that contains a chatter thread, Kanban view, list view, or activities view of an application.
Chatter
Có thể tạo hoạt động từ nội dung trò chuyện trên bất kỳ bản ghi nào.
To schedule a new activity, click the Activities button, located at the top of the chatter. In the Schedule Activity pop-up window that appears, fill out the Schedule Activity form.
Chế độ xem kanban
Activities can also be created from the (Kanban) view.
To do so, click on the (clock) icon located at the bottom of an individual record.
Click + Schedule An Activity, then proceed to fill out the Schedule Activity form.

Ghi chú
If a record already has a scheduled activity, the (clock) icon is replaced by the icon that represents the existing scheduled activity. Click on the activity type’s icon to schedule another activity.
Xem danh sách
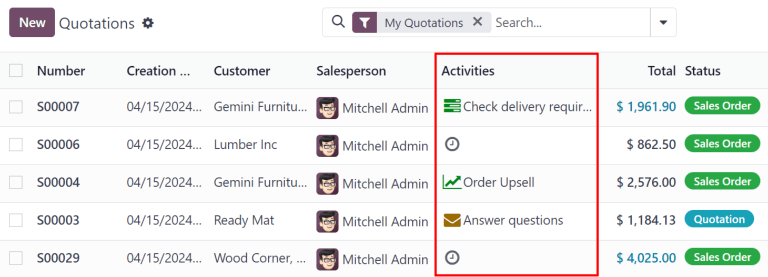
Activities can also be created from a (list) view.
If the Activities column is hidden, reveal it using the (settings adjust) icon in the far-right of the top row.
Then, click on the (clock) icon for the record the activity is being added to, and click + Schedule an activity. Proceed to fill out the Schedule Activity form that appears.
Ghi chú
If a record already has a scheduled activity, the (clock) icon is replaced by the icon that represents the existing scheduled activity. Click on the activity type’s icon to schedule another activity.
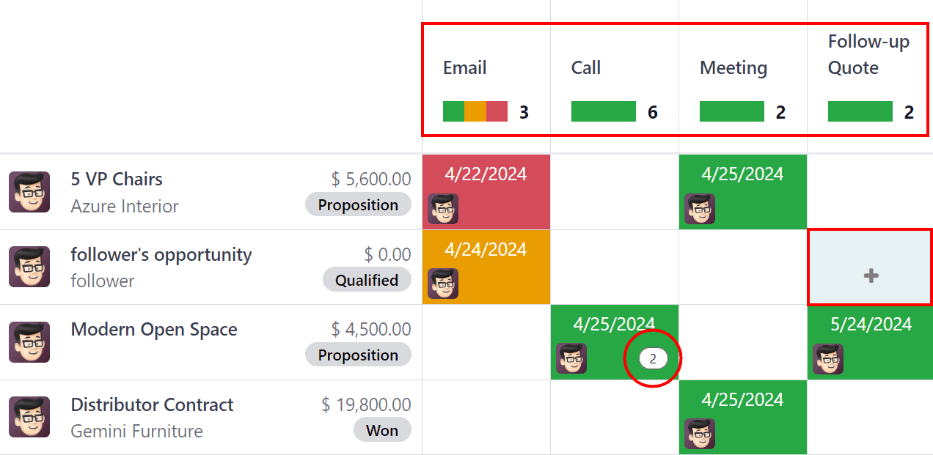
Xem hoạt động
Most applications in Odoo have an Activity view available. If available, a (clock) icon is visible in the top-right corner of the main menu bar, amongst the other view option icons.
To open the activity view, click the (clock) icon.
Ở chế độ xem này, mọi hoạt động có sẵn sẽ được liệt kê trong các cột, trong khi các dòng theo chiều ngang thể hiện tất cả bản ghi riêng lẻ.
Các hoạt động hiển thị màu xanh lá cây có thời hạn trong tương lai, các hoạt động hiển thị màu cam đến hạn vào hôm nay, trong khi các hoạt động hiển thị màu đỏ là đã quá hạn.
Thanh màu trong mỗi cột biểu thị các bản ghi cho những loại hoạt động cụ thể và hiển thị số cho biết có bao nhiêu hoạt động được lên lịch cho loại hoạt động đó.
Nếu có nhiều loại hoạt động được lên lịch cho một bản ghi, một con số tương ứng với tổng số hoạt động đã lên lịch sẽ xuất hiện.
Ghi chú
Màu sắc của hoạt động và mối quan hệ của chúng với ngày hết hạn của hoạt động thống nhất trong Odoo, bất kể loại hoạt động hay chế độ xem.
To schedule an activity for a record, hover over the corresponding field. Click the (plus) icon that appears, and then fill out the Schedule Activity form.
Biểu mẫu Lên lịch hoạt động
Activities can be scheduled from many different places, such as from the chatter of a record, or from one of multiple views in an application, when available: the Kanban view, list view, or activity view.
Nhập thông tin sau đây trên biểu mẫu:
Activity Type: select the type of activity from the drop-down menu. The default options are: Email, Call, Meeting, or To-Do. Depending on what other applications are installed, additional options may be available.
Summary: enter a short title for the activity, such as
Discuss Proposal.Due Date: using the calendar popover, select the activity’s deadline.
Assigned to: by default, the current user populates this field. To assign a different user to the activity, select them from the drop-down menu.
Notes: add any additional information for the activity in this field.
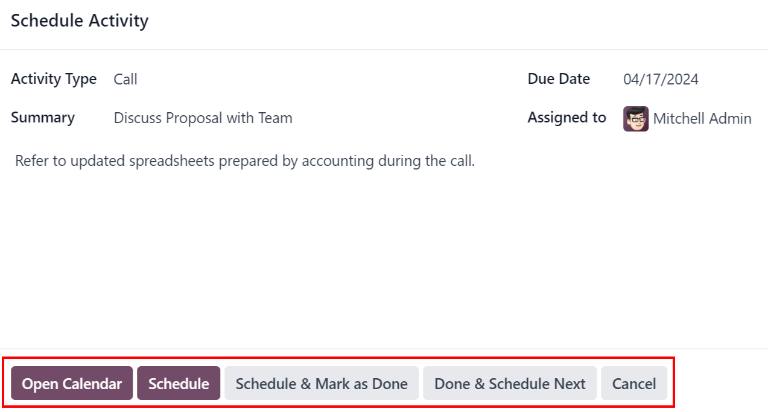
When the Schedule Activity pop-up window is completed, click one of the following buttons:
Open Calendar: opens the user’s calendar to add and schedule the activity.
Click on the desired date and time for the activity, and a New Event pop-up window appears. The summary from the Schedule Activity pop-up window populates the Title field.
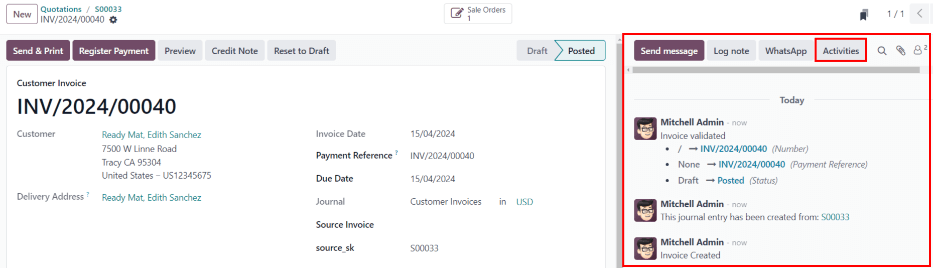
Enter the information in the New Event pop-up window, then click Save & Close to schedule it. Once scheduled, the activity is added to the chatter under the Planned Activities section.
Quan trọng
The Open Calendar button only appears if the Activity Type is set to either Call or Meeting.
Schedule: schedules the activity, and adds the activity to the chatter under Planned Activities.
Schedule & Mark as Done: adds the details of the activity to the chatter under Today. The activity is not scheduled, and is automatically marked as done.
Done & Schedule Next: adds the details of the activity to the chatter under Today. The activity is not scheduled, is automatically marked as done, and a new Schedule Activity pop-up window appears.
Cancel: discards any changes made on the Schedule Activity pop-up window.
Tất cả hoạt động đã lên lịch
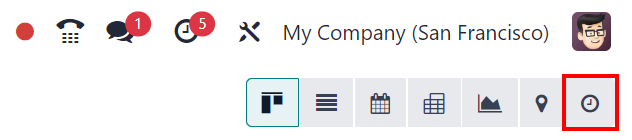
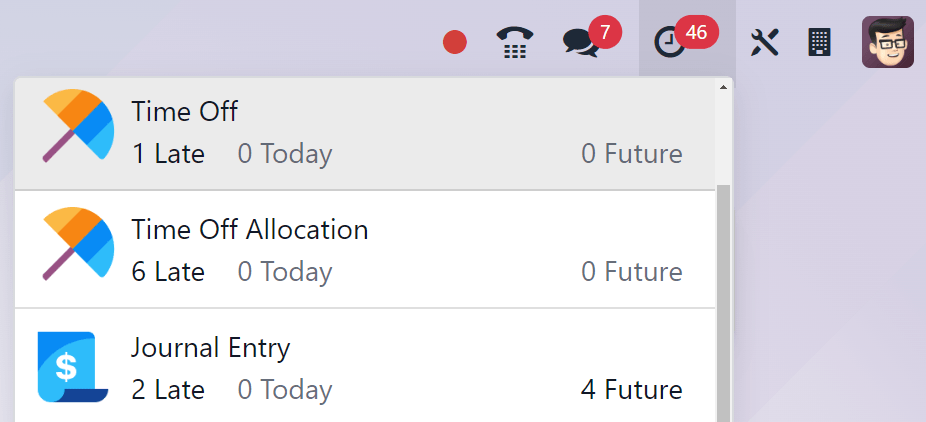
To view a consolidated list of activities, organized by application, click the (clock) icon in the header menu, located in the top-right corner.
If any activities are scheduled, the number of activities appear in a red bubble on the (clock) icon.
All activities for each application are further divided into subsections, indicating where in the application the activity is to be completed. Each sub-section lists the number of scheduled activities that are Late, due Today, and scheduled in the Future.
Example
Trong ứng dụng Nghỉ phép, một hoạt động được lên lịch thực hiện trong trang chủ Tất cả đơn nghỉ phép và sáu hoạt động được lên lịch thực hiện trong trang chủ Phân bổ.
Các yêu cầu này xuất hiện trong hai danh sách riêng biệt trong menu thả xuống tất cả hoạt động: một danh sách có nhãn Nghỉ phép và một danh sách có nhãn Phân bổ thời gian nghỉ phép.
Yêu cầu tài liệu
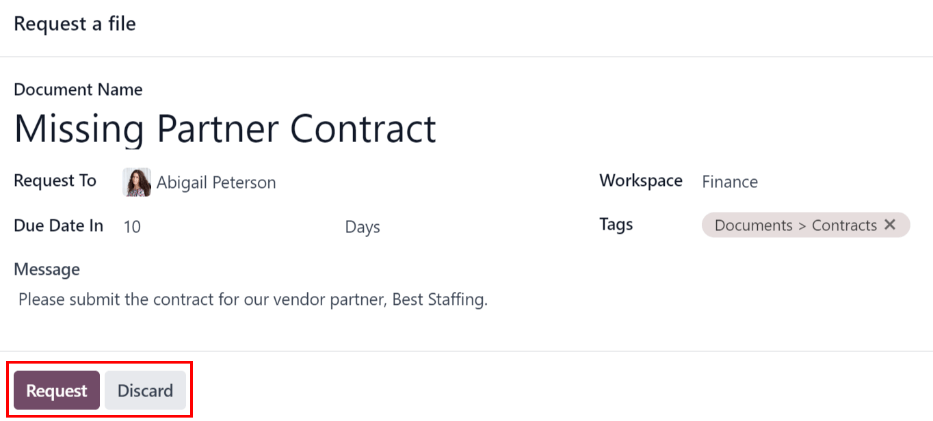
The option to Request a Document is available at the bottom of the list of all scheduled activities, the option to Request a Document appears. Click Request a Document, and a Request a file pop-up window appears.
Nhập thông tin sau đây trên biểu mẫu:
Document Name: enter a name for the document being requested.
Request To: select the user the document is being requested from using the drop-down menu.
Due Date In: enter a numerical value indicating when the document is due. Next to this field, a Days field is visible. Click Days, the default option, to reveal a drop-down menu. Select the desired time-frame option from the list. The options are Days, Weeks, or Months.
Workspace: using the drop-down menu, select the specific Workspace the document is being uploaded to.
Tags: select any desired tags from the drop-down menu. The available tags displayed are based on the tags configured for the selected Workspace.
Message: enter a message to clarify the document request in this field.
When all the fields are completed, click Request to send the document request.
Loại hoạt động
To view the currently configured types of activities in the database, navigate to .
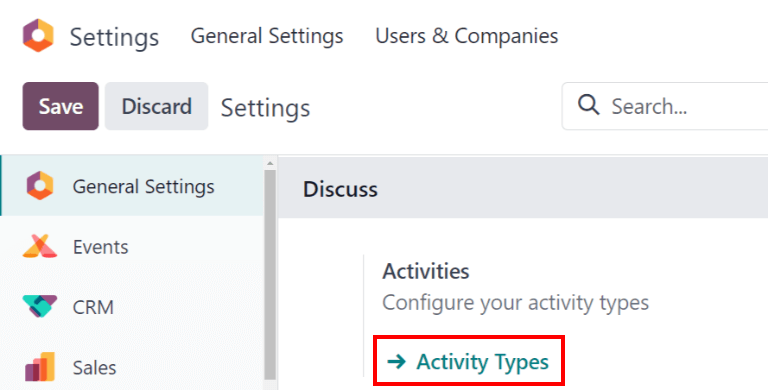
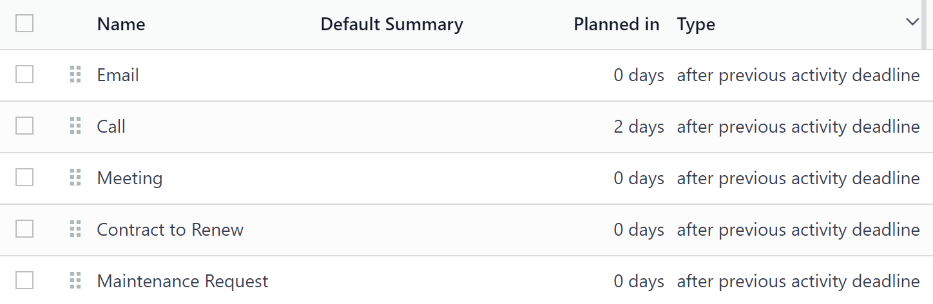
Doing so reveals the Activity Types page, where the existing activity types are found.
Mẹo
Individual applications have a list of Activity Types dedicated to that application. For example, to view and edit the activities available for the CRM application, go to .
Chỉnh sửa loại hoạt động
To edit an existing activity type, click on the activity type, and the activity type form loads.
Make any desired changes to the activity type form. The form automatically saves, but it can be saved manually at any time by clicking the Save Manually option, represented by a (cloud upload) icon, located in the top-left corner of the page.
Tạo loại hoạt động mới
To create a new activity type, click New from the Activity Types page, and a blank activity type form loads.
Enter a Name for the activity type at the top of the form, then enter the following information on the form.
Phần cài đặt hoạt động
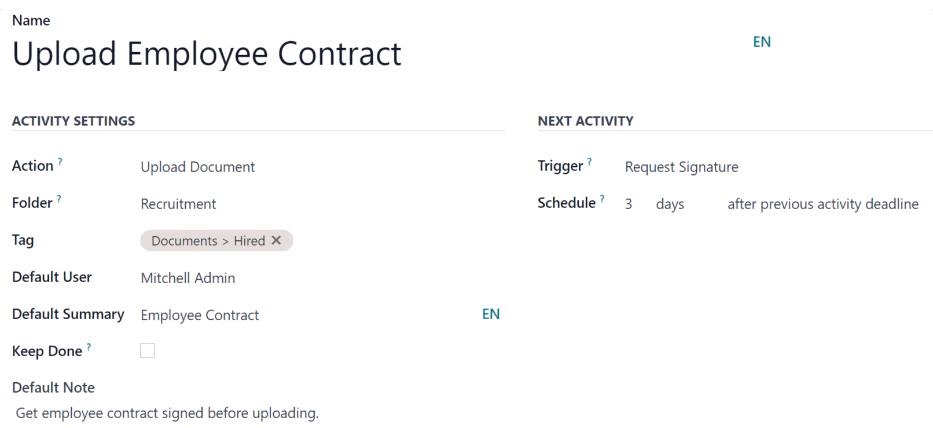
Action: using the drop-down menu, select an action associated with this new activity type. Some actions trigger specific behaviors after an activity is scheduled, such as:
Upload Document: if selected, a link to upload a document is automatically added to the planned activity in the chatter.
Call or Meeting: if selected, users have the option to open their calendar to select a date and time for the activity.
Request Signature: if selected, a link to open a signature request pop-up window is automatically added to the planned activity in the chatter. This requires the Odoo Sign application to be installed.
Ghi chú
Các loại hoạt động khả dụng khác nhau tùy theo ứng dụng được cài đặt trong cơ sở dữ liệu.
Folder: select a specific workspace folder to save a document to. This field only appears if Upload Document is selected for the Action.
Using the drop-down menu, select the Folder the document is saved to.
Default User: select a user from the drop-down menu to automatically assign this activity to the selected user when this activity type is scheduled. If this field is left blank, the activity is assigned to the user who creates the activity.
Default Summary: enter a note to include whenever this activity type is created.
Ghi chú
The information in the Default User and Default Summary fields are included when an activity is created. However, they can be altered before the activity is scheduled or saved.
Keep Done: tick this checkbox to keep activities that have been marked as
Donevisible in the activity view.Default Note: enter any notes to appear with the activity.
Phần hoạt động tiếp theo
It is possible to have another activity either suggested or triggered. To do so, configure the Next Activity section.
Chaining Type: select either Suggest Next Activity or Trigger Next Activity from the drop-down menu. Depending on the selected option, either the Suggest or Trigger field is displayed.
Ghi chú
The Chaining Type field does not appear if Upload Document is selected for the Action.
Suggest/Trigger: depending on what is selected for the Chaining Type, this field either displays Suggest or Trigger. Using the drop-down menu, select the activity to recommend or schedule as a follow-up task to the activity type.
Schedule: configure when the next activity is suggested or triggered.
Đầu tiên, nhập giá trị số cho biết thời điểm hoạt động được đề xuất hoặc kích hoạt.
Next to this field, a Days field is visible. Click Days, the default option, to reveal a drop-down menu. Select the desired time-frame option from the list. The options are Days, Weeks, or Months.
Lastly, using the drop-down menu, select whether the activity is scheduled or triggered either after previous activity deadline or after completion date.