Liên hệ
Các liên hệ được tạo trong ứng dụng Liên hệ dành cho khách hàng mà công ty giao dịch thông qua Odoo. Liên hệ là nơi lưu trữ thông tin kinh doanh quan trọng, tạo điều kiện thuận lợi cho việc trao đổi thông tin và giao dịch kinh doanh.
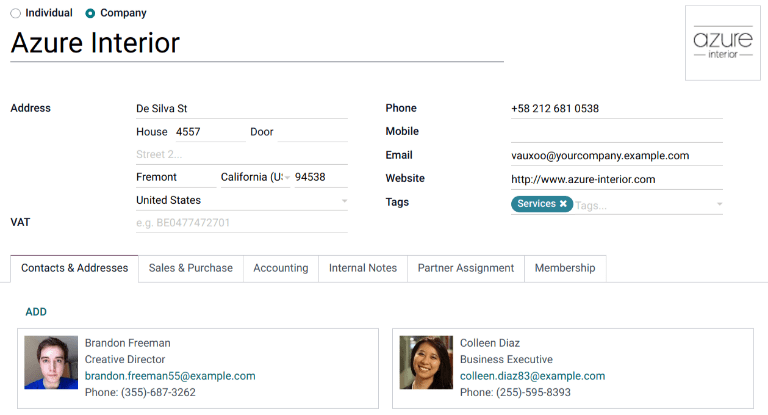
Biểu mẫu liên hệ
To create a new contact, navigate to the , and click Create. A new form appears where various contact information can be added.
Loại liên hệ
Odoo allows for both Individual and Company contacts. Select either Individual or Company, depending on the type of contact that is being added.
Tên
First, fill in the name of the Individual or Company. This is how the name appears throughout the database. This field is mandatory.
Mẹo
Individual contacts can have a Company contact linked to it. After selecting Individual, a new Company Name... field appears below the first name field.
Địa chỉ
Next, enter the Address of the Company or Individual.
Mẹo
If the Individual option is chosen, then the type of address can be chosen from a drop-down menu. Options for this drop-down menu include: Contact, Invoice Address, Delivery Address, Other Address, and Private Address.
Trường bổ sung
Thông tin bổ sung được bao gồm trong biểu mẫu ban đầu. Gồm có các trường sau đây:
VAT: Value Added Tax number.
Citizen Identification: citizen or government identification number (only available on Individual).
Job Position: list the job position of the Individual (only available on Individual).
Phone: list phone number (with country code). Make a call, send an SMS, or WhatsApp message by hovering over the field on the saved form, and clicking the desired option.
Mobile: list mobile phone number (with country code). Make a call, send an SMS, or WhatsApp message by hovering over the field on the saved form, and clicking on the desired option.
Email: enter the email address with the domain.
Website: enter the full website address, starting with
httporhttps.Title: select Doctor, Madam, Miss, Mister, Professor, or create a new one directly from this field.
Tags: enter preconfigured tags by typing them in the field, or clicking the drop-down menu, and selecting one. To create a new one, type the new tag in the field, and click Create from the resulting drop-down menu.
Tab Liên hệ & Địa chỉ
At the bottom of the contact form are several tabs. On the Contacts & Addresses tab, contacts can be added that are associated with a Company and related addresses. For example, a specific contact person for the company can be listed here.
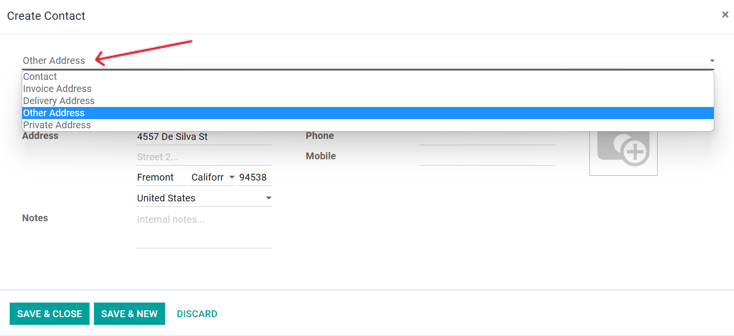
Multiple addresses can be added on both Individual and Company contacts. To do so, click Add in the Contacts & Addresses tab. Doing so reveals a Create Contact pop-up form, in which additional addresses can be configured.
On the Create Contact pop-up form, start by clicking the default Other Address field at the top to reveal a drop-down menu of address-related options.
Chọn bất kỳ tùy chọn nào sau đây:
Contact: adds another contact to the existing contact form.
Invoice Address: adds a specific invoice address to the existing contact form.
Delivery Address: adds a specific delivery address to the existing contact form.
Other Address: adds an alternate address to the existing contact form.
Private Address: adds a private address to the existing contact form.
Sau khi chọn một tùy chọn, hãy nhập thông tin liên hệ tương ứng cần sử dụng cho loại địa chỉ đã chỉ định.
Add the Contact Name, Address, Email, along with the Phone and/or Mobile numbers below.
Set the Job Position, which appears if the Contact address type has been selected. This is similar to the Individual contact.
To add a note, click on the text field next to Notes, and write anything that is applicable to the customer or contact.
Then, click Save & Close to save the address, and close the Create Contact window. Or, click Save & New to save the address, and immediately input another one.
Tab Bán hàng & Mua hàng
Next, is the Sales & Purchases tab, which only appears when the Sales, Purchase, or Point of Sale applications are installed.
The Fiscal Position can be set on the Sales & Purchases tab. Select a Fiscal Position from the drop-down menu.
Phần bán hàng
Under the Sales heading, a specific Salesperson can be assigned to a contact. To do that, click the Salesperson drop-down field, and select one. Create a new Salesperson by typing the user’s name, and making the appropriate selection.
Certain Payment Terms, or a certain Pricelist, can also be set, if needed. Click the drop-down menu next to Payment Terms, and change it to one of the preselected Payment Terms, or Create a new one. Select the Pricelist drop-down menu to choose the appropriate Pricelist.
Click into the Delivery Method field to select an option from the drop-down menu.
Phần Điểm bán hàng
Under the Point Of Sale heading, enter a Barcode that can be used to identify the contact. Use the Loyalty Points field to track points the user won as part of a Loyalty Program.
Phần mua hàng
Specify Payment Terms, 1099 Box information, and a preferred Payment Method here. A Receipt Reminder can be set here, as well.
Phần thông tin khác
Under the Misc. heading, use Reference field to add any additional
information for this contact. If this contact should only be accessible for one company in a
multi-company database, select it from the Company field drop-down list. Use the
Website drop-down menu to restrict the publishing of this contact to one website (if
working on a database with multiple websites). Select one or more Website Tags to assist
in filtering published customers on the /customers website page. Select an Industry
for this contact from the drop-down menu. Use the SLA Policies field to assign a
Helpdesk SLA policy to this contact.
Tab kế toán
The Accounting tab appears when the Accounting application is installed. Here, a user can add any related Bank Accounts, or set default Accounting entries.
Under the Miscellaneous heading, use the LEI field to enter a Legal Entity Identifier, if necessary.
Tab ghi chú nội bộ
Following the Accounting tab is the Internal Notes tab, where notes can be left on this contact form, just like on the contact form noted above.
Tab phân công đối tác
Next is the Partner Assignment tab, which by default, includes a Geolocation section, and other partner options, including Partner Activation and Partner Review configurations. These are only present when the Resellers module is installed.
Xem thêm
Follow the Resellers documentation for more information on publishing partners on the website.
Tab chương trình thành viên
Finally, there is the Membership tab on contact forms, which can help users manage any memberships that are being offered to this specific contact. It should be noted that this tab only appears when the Members application is installed.
Kích hoạt chương trình thành viên
To activate a contact’s membership, click Buy Membership in the Membership tab of a contact form. On the pop-up window that appears, select a Membership from the drop-down menu. Then, configure a Member Price. Click Invoice Membership when both fields are filled in.
Alternatively, to offer a free membership, tick the Free Member checkbox, in the Membership tab of a contact form.
Xem thêm
Follow the Members documentation for more information on publishing members on the website.
Lưu trữ liên hệ
If a user decides they no longer want to have this contact active, the record can be archived. To do that, go to the Action menu at the top of the contact form, and click Archive.
Then, click OK from the resulting Confirmation pop-up window.
With this contact successfully archived, as indicated by a banner at the top, they do not show up in the main contacts page, but they can still be searched for with the Archived filter.
Mẹo
A contact can be unarchived, if the user decides to work with them again. To do that, just click the Action menu again at the top of the archived contact form, and click Unarchive. Upon doing so, the Archived banner is removed, and the contact is restored.