Gelato
Gelato is a global print-on-demand platform that integrates with Odoo to sync product catalogs and automate order fulfillment.
Connecting Gelato’s services with Odoo’s Sales and eCommerce apps enables the following:
Sync Odoo sales orders with Gelato for automated order fulfillment
Create and manage Gelato products within Odoo; supports product variant and image sync
Configure delivery options in Odoo and receive order updates via webhooks.
Configuration
Important
The company information (Company name and Billing address) in the Gelato account must match the company information in the Odoo database in order for sales orders to be confirmed and sent to Gelato for fulfillment.


Configure API keys and webhooks in Gelato
Before configuring the Gelato connector in Odoo, first obtain API credentials and webhooks from the Gelato account.
API connectors enable Odoo Sales to send and receive data from Gelato for order processing, while webhooks provide real-time updates on order status and shipment tracking.
API Key
An API Key is a unique authentication token that allows Odoo to securely communicate with Gelato’s API, enabling order transmission, status updates, and data synchronization.
After logging into Gelato, click Developer in the left menu bar. From here, click on API keys. In the new page, click the Add API Key button to open a new API key form. Type in a name, then click Create Key.
Copy the generated API key using Copy to Clipboard.
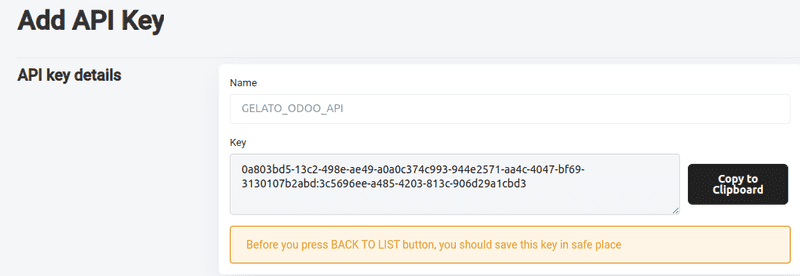
Important
Copy the API key and store it somewhere safe and secure before leaving this page. Once the page is refreshed or exited, the key will not be available to copy.
If the key cannot be copied or is lost, return to the API key page and start over, creating a new API key.
Webhook
A webhook is an automated notification system that instantly updates Odoo when Gelato processes, ships, or delivers an order, ensuring real-time tracking and minimal manual intervention.
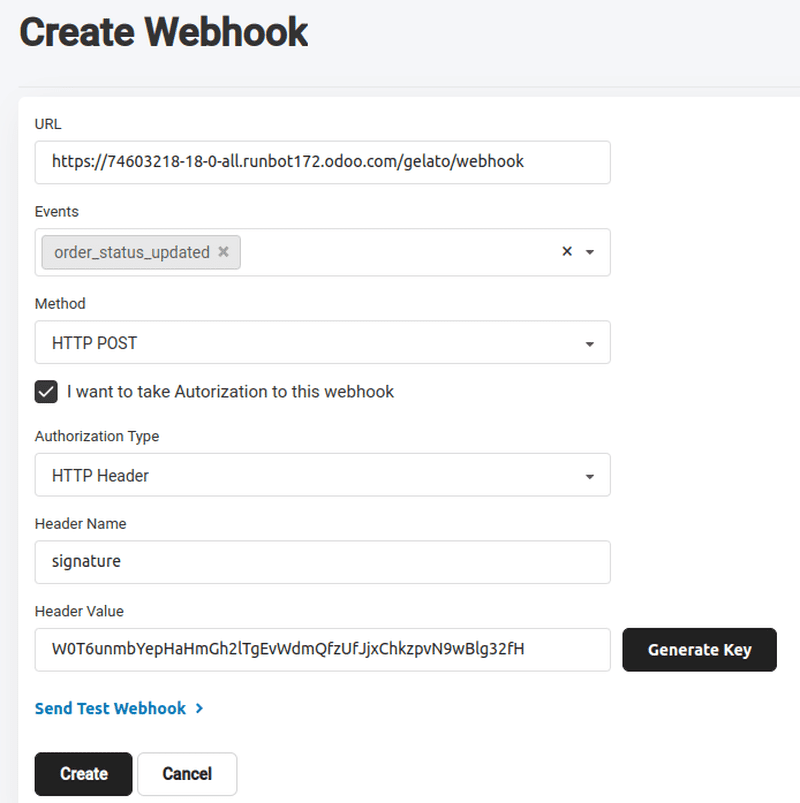
To create a webhook, go to under the Developer drop-down menu in the left menu bar. In the new page, click Add Webhook to open a Create Webhook form.
The webhook form requires several specific configurations:
URL: This tells Gelato where to send the order updates in Odoo. Copy and paste the Odoo database URL with the additional suffix
/gelato/webhook.Example
https://stealthywood.odoo.com/gelato/webhookEvents: Click into the field and select order_status_updated. Selecting order_status_updated ensures Odoo receives order changes automatically.
Method: Click into the field and select the HTTP Post option, as this is the request method used to send data from Gelato to Odoo.
Tick the checkbox next to I want to take Authorization to this webhook.
Header Name: In this field, type in
signatureto match the field in Odoo.Click Generate Key to generate a Header Value.
Click Create to complete this webhook configuration.
Tip
Copy and paste the API key and webhook on a notepad before tabbing out of the Gelato webpage as backup.
Configure Gelato connector in Odoo
In Odoo, navigate to , then scroll to the Connectors section. Enable the Gelato connector by ticking the checkbox. Next, paste the newly generated API keys and webhook secret key into their respective fields. Once saved, Gelato is available in Odoo Sales and eCommerce products.
Synchronizing Gelato products with Odoo Sales
It is recommended to have products already configured in Gelato before configuring them in Odoo. To get the product ID in Gelato, navigate to the Templates page from the side bar menu. Select which product to synchronize in Odoo, then hover over the product card to reveal the (vertical ellipsis) menu icon. Click the menu icon, then click Copy Template ID to copy the product template ID to the clipboard.
Odoo Sales product
To create a product in Odoo that matches the Gelato product, navigate to , select New to create a new product form. Type in the product Name, then navigate to the Sales tab. Find the Gelato section, then click into the Template Reference field and paste the copied template ID from the Gelato product. Finally, click Synchronize.
Successful synchronization pulls the Gelato product variant options into the newly configured Odoo product.
In the new Print Images field, click the default marker to set a default product image. Click the (edit) icon and select the product image file to upload, then Save & Close.
Important
The Print Images field must be configured on all Gelato products and their respective product variations before they can be ordered.
Product variants
To view and edit the newly synchronized product variants, navigate to the Attributes & Variants tab, which will have the variants pulled from the Gelato product configuration. Click the Configure button to edit and configure the variant images, delivery methods, additional pricing, etc.
Order a Gelato product from Odoo
Once synchronized, Gelato products are available to order in Odoo through sales quotations or on the eCommerce store. Gelato delivery options are automatically synchronized upon API and webhook configuration.
To add Gelato delivery, click Add shipping on the sales order. Select Standard Delivery or Express Delivery in the Shipping Method field, then click Get rate.
Once the quotation is confirmed, it becomes an active sales order, and the order is sent to Gelato for fulfillment. Once a sales order is sent from Odoo to Gelato, Gelato processes the order, produces the product at the nearest fulfillment center, and ships it directly to the end-customer.
See also
Important
When creating a sales order for Gelato products in the database, only Gelato products can be added to the same sales order. Multivendor orders are not available with the Gelato connector at this time.