Data Cleaning
The Odoo Data Cleaning app maintains data integrity and consistency with the following features:
Deduplicates: merges or removes duplicate entries to ensure data is unique.
Recycles: identifies outdated records to either archive or delete them.
Formats: standardizes text data by finding and replacing it according to specified needs.
Customizable rules ensure text data stays up-to-date, streamlined, consistently formatted, and aligned with company-specific formatting requirements.
Install modules
The Data Cleaning application consists of several modules. Install the following to access all available features:
Name
Technical name |
Description |
|---|---|
Data Recycle
data_recycle |
Base module to enable the recycle feature, available on Odoo Community edition. |
Data Cleaning
data_cleaning |
Enables field cleaning feature to format text data across multiple records, available only on Odoo Enterprise edition. |
Data Cleaning (merge)
data_merge |
Enables the deduplication feature to find similar (or duplicate) records, and merge them, available only on Odoo Enterprise edition. |
CRM Deduplication
data_merge_crm |
Enables the deduplication feature on the CRM app, and uses the CRM default merging feature. |
Helpdesk Merge action
data_merge_helpdesk |
Enables the merge feature for the Helpdesk app. |
Project Merge action
data_merge_project |
Enables the merge feature for the Projects app. |
UTM Deduplication
data_merge_utm |
Enables the merge feature for the UTM Tracker app. |
WMS Accounting Merge
data_merge_stock_account |
Creates a warning in cases of products merging that may affect inventory valuation, if the Inventory app is installed. |
Deduplication
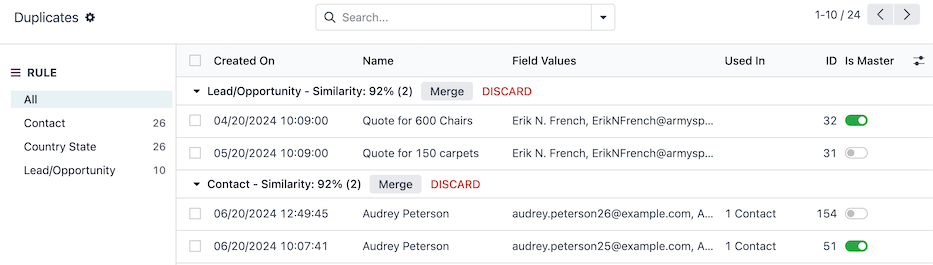
The Duplicates dashboard groups similar records to be merged by matching conditions within the records set by the deduplication rules.
Navigate to this dashboard by going to .
The RULE sidebar lists each of the active deduplication rules, and displays the total number of duplicates detected beside each rule.
By default, the All rule is selected. Records are grouped by their rule, with a Similarity rating (out of 100%), with the following columns:
Created On: the date and time the original record was created.
Name: the name or title of the original record.
Field Values: the original record’s values for the fields used to detect duplicates.
Used In: lists other models referencing the original record.
ID: the original record’s unique ID.
Is Master: the duplicates are merged into the master record. There can only be one master record in a grouping of similar records.
Select a specific rule in the RULE sidebar to filter the duplicate records.
Merge duplicate records
To merge records, first choose a master record within the grouping of similar records. The master record acts as the base, at which any additional information from similar records are merged into.
Optionally, no master record can be set, leaving Odoo to choose a record at random to merge into.
Next, click the Merge button at the top of the similar records grouping. Then, click Ok to confirm the merge.
Once a record is merged, a message is logged in the chatter of the master record, describing the merge. Certain records, like Project tasks, are logged in the chatter with a link to the old record as a convenient reference of the merge.
Tip
Discard groupings by clicking the DISCARD button. Upon doing so, the grouping is hidden from the list and archived.
View discarded groupings by selecting the Discarded filter from the search bar.
Deduplication rules
The Deduplication Rules set the conditions for how records are detected as duplicates.
These rules can be configured for each model in the database, and with varying levels of specificity. To get started, navigate to .
Tip
The deduplication rules run once every day, by default, as part of a scheduled action cron (Data Merge: Find Duplicate Records). However, each rule can be ran manually anytime.
Modify a deduplication rule
Select a default rule to edit, or create a new rule by clicking on the New button.
First, choose a Model for this rule to target. Selecting a model updates the rule title to the chosen model.
Optionally, configure a Domain to specify the records eligible for this rule. The number of eligible records is shown in the # record(s) link.
Depending on the selected Model, the Duplicate Removal field appears. Choose whether to Archive or Delete merged records.
Next, select a Merge Mode:
Manual: requires each duplicate grouping to be manually merged, also enables the Notify Users field.
Automatic: automatically merges duplicate groupings, without notifying users, based on the records with a similarity percentage above the threshold set in the Similarity Threshold field.
Enable the Active toggle to start capturing duplicates with this rule as soon as it is saved.
Lastly, create at least one deduplication rule in the Deduplication Rules field, by clicking Add a line, under the Unique ID Field column.
Select a field in the model from the Unique ID Field drop-down menu. This field is referenced for similar records.
Select a matching condition in the Match If field to apply the deduplication rule, depending on the text in the Unique ID Field:
Exact Match: the characters in the text match exactly.
Case/Accent Insensitive Match: the characters in the text match, regardless of casing and language-specific accent differences.
Important
At least one Deduplication Rules must be set for the rule to capture duplicates.
Tip
A few more fields are available for an advanced configuration.
If on a multi-company database, the Cross-Company field is available. When enabled, duplicates across different companies are suggested.
Activate Developer mode (debug mode) to display the Suggestion Threshold field. Duplicates with a similarity below the threshold set in this field are not suggested.
With the rule’s configuration complete, either close the rule form, or run the rule manually to instantly capture duplicate records.
Manually run a deduplication rule
To manually run a specific deduplication rule at any time, navigate to , and select the rule to run.
Then, on the rule form, select the Deduplicate button on the top-left. Upon doing so, the Duplicates smart button displays the number of duplicates captured.
Click on the Duplicates smart button to manage these records.
Recycle records
Use the recycle records feature to rid the database of old and outdated records.
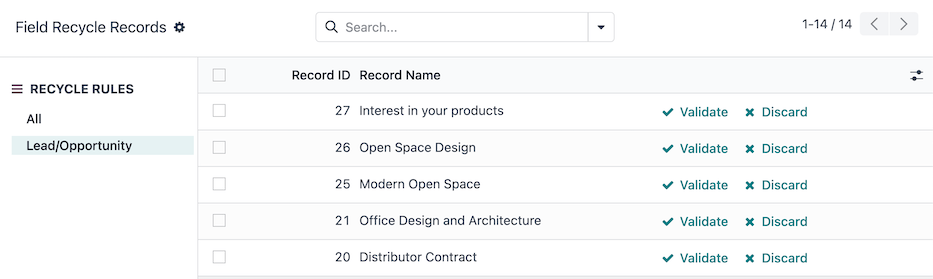
The Field Recycle Records dashboard displays records that can be archived or deleted, by matching conditions within the records set by the recycle record’s rules.
Navigate to this dashboard by going to .
The RECYCLE RULES sidebar lists each of the active recycle record rules.
By default, the All option is selected. Records are displayed with the following columns:
Record ID: the ID of the original record.
Record Name: the name or title of the original record.
Select a specific rule in the RECYCLE RULES sidebar to filter the records.
To recycle records, click the Validate button on the row of the record.
Upon doing so, the record is recycled, depending on how the rule is configured, to be either archived or deleted from the database.
Tip
Discard groupings by clicking the Discard button. Upon doing so, the record is hidden from the list, and is not detected by the recycle rule again in the future.
View discarded records by selecting the Discarded filter from the search bar drop-down menu.
Recycle record rules
The Recycle Records Rules set the conditions for how records are recycled.
These rules can be configured for each model in the database, and with varying levels of specificity. To get started, navigate to .
Tip
Recycle rules run once a day, by default, as part of a scheduled action cron (Data Recycle: Clean Records). However, each rule can be run manually anytime.
By default, no recycle record rules exist. Click the New button to create a new rule.
On the recycle record rule form, first choose a Model for this rule to target. Selecting a model updates the rule title to the chosen model.
Optionally, configure a Filter to specify the records eligible for this rule. The number of eligible records is shown in the # record(s) link.
Next, configure the field and time range for how the rule detects the records to recycle:
Time Field: select a field from the model to base the time (Delta).
Delta: type the length of time, which must be a whole number (e.g.
7).Delta Unit: select the unit of time (Days, Weeks, Months, or Years).
Then, select a Recycle Mode:
Manual: requires each detected record to be manually recycled, and enables the Notify Users field.
Automatic: automatically merges recycled groupings, without notifying users.
Lastly, select a Recycle Action to either Archive or Delete records. If Delete is selected, choose whether or not to Include Archived records in the rule.
With the rule’s configuration complete, either close the rule form, or run the rule manually to instantly capture records to recycle.
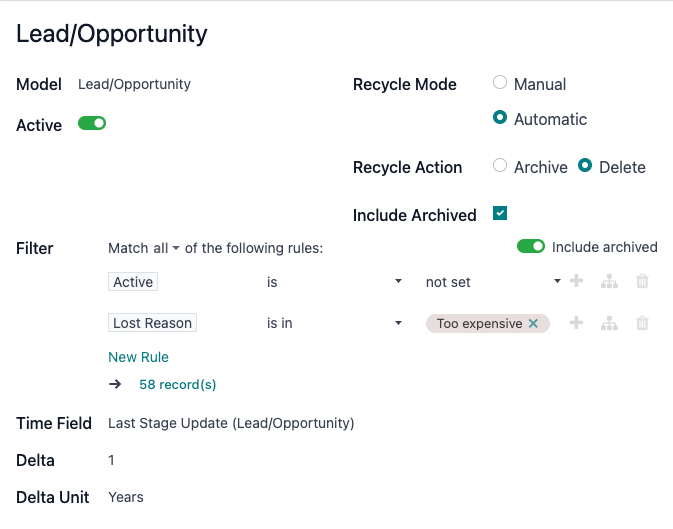
Example
A recycle rule can be configured to delete archived leads and opportunities that were last updated a year ago, and with a specific lost reason, by using the following configuration:
Model: Lead/Opportunity
Filter:
Activeisnot setLost Reasonis inToo expensive
Time Field: Last Updated on (Lead/Opportunity)
Delta:
1Delta Unit: Years
Recycle Mode: Automatic
Recycle Action: Delete
Include Archived:
Manually run a recycle rule
To manually run a specific recycle rule at any time, navigate to , and select the rule to run.
Then, on the rule form, click the Run Now button on the top-left. Upon doing so, the Records smart button displays the number of records captured.
Click the Records smart button to manage these records.
Field cleaning
Use the field cleaning feature to maintain consistent formatting of names, phone numbers, IDs and other fields throughout a database.
The Field Cleaning Records dashboard displays formatting changes to data in fields of a record, to follow a convention set by the field cleaning rules.
Navigate to this dashboard by going to .

The CLEANING RULES sidebar lists each of the active cleaning rules.
By default, the All rule is selected. Records are listed with the following columns:
Record ID: the ID of the original record.
Record Name: the name or title of the original record.
Field: the original record’s field that contains the value to format.
Current: the current value in the field of the original record.
Suggested: the suggested formatted value in the field of the original record.
To clean and format records, click the Validate button on the row of the record.
Upon doing so, the record is formatted and/or cleaned.
Tip
Discard records by clicking the Discard button. Upon doing so, the record is hidden from the list and will not be detected by the field cleaning rule again in the future.
View discarded records by selecting the Discarded filter from the search bar.
Field cleaning rules
The Field Cleaning Rules set the conditions for fields to be cleaned and/or formatted.
These rules can be configured for each model in the database, and with varying levels of specificity. To get started, navigate to .
Tip
The field cleaning rules run once every day, by default, as part of a scheduled action cron (Data Cleaning: Clean Records). However, each rule can be ran manually anytime.
By default, a Contact rule exists to format and clean up the Contacts app records. Select the Contact record to make edits, or select the New button to create a new rule.
On the field cleaning rule form, first choose a Model for this rule to target. Selecting a model updates the rule title to the chosen model.
Next, configure at least one rule by clicking Add a line in the Rules section.
Upon doing so, a Create Rules popover window appears with the following fields to configure:
Select a Field To Clean from the model to assign to an action.
Choose one of the following Action options:
Trim Spaces reveals the Trim field to select the All Spaces or Superfluous Spaces option. Leading, trailing, and successive spaces are considered superfluous.
Example
The contact name
Dr. John Doecan be formatted with the following Trim options:All Spaces:
DR.JohnDoeSuperfluous Spaces:
DR. John Doe
Set Type Case reveals the Case field to select either First Letters to Uppercase, All Uppercase, or All Lowercase.
Example
The lead/opportunity title
lumber inc, Lorraine douglascan be formatted with the following Case options:First Letters to Uppercase:
Lumber Inc, Lorraine DouglasAll Uppercase:
LUMBER INC, LORRAINE DOUGLASAll Lowercase:
lumber inc, lorraine douglas
Format Phone converts the phone number to an international country format.
Example
Belgium:
061928374+32 61 92 83 74United States:
800 555-0101+1 800-555-0101
Scrap HTML converts HTML to plain text.
Once a field and action are selected, click Save to close the Create Rules popover window.
Then, select a Cleaning Mode:
Manual: requires each detected field to be manually cleaned and enables the Notify Users field.
Automatic: automatically cleans fields without notifying users.
With the rule’s configuration complete, either close the rule form, or run the rule manually to instantly capture fields to clean.
Manually run a field cleaning rule
To manually run a specific field cleaning rule at any time, navigate to , and select the rule to run.
Then, on the rule form, select the Clean button on the top-left. Upon doing so, the Records smart button displays the number of records captured.
Click on the Records smart button to manage these records.
Merge action manager
The Merge Action Manager enables or disables the Merge action available in the Actions menu for models in the database.
Enable Developer mode (debug mode) and navigate to .
Models are listed with the following columns:
Model: technical name of the model.
Model Description: display name of the model.
Type: whether the model is of the Base Object or Custom Object type.
Transient Model: the model handles temporary data that does not need to be stored long-term in the database.
Can Be Merged: enables the Merge action for the model.
To view which models are enabled by default, use the search bar to filter models that Can Be Merged.
See also